In this video we show you how to install one of our Shadow® V2 Overflows onto an aquarium. We show you our technique on how we install the Shadow Overflow. Everyone’s system will be different, so use this video as a general guide on how to install it properly. This video assumes that you have already drilled your aquarium or had a reputable tank builder do it for you. The alignment procedure is very important for a leak free system. It is simple to do.
All of the components in the video can be purchased directly from our website https://synergyreef.com
As always if you need any assistance, feel free to contact us directly and we will be happy to help.
Installation Instructions: Thank you for choosing the Synergy Reef V1 Shadow® Overflow. Please note that these instructions are ONLY For the V1 Version of the Shadow® Overflow. The V1 has a serial number of 4999 and below. This is a Do-It-Yourself project and can be installed in either glass or acrylic aquariums. Always keep in mind that working with power tools, glass and acrylic have inherent dangers, including personal injury, electrocution, accidental death, or cracked glass, so please be careful and wear gloves, shoes, pants, eye protection, etc… If you have any questions or concerns, please contact us.
Prior to installation, be sure that you have everything you will need to complete the installation. This includes, but is not limited to the following:
Aquarium, either glass or acrylic, if it’s glass please make sure the panel you are going to drill is NOT TEMPERED! If you are uncertain about this then STOP and please contact the tank manufacturer. If you attempt to drill a tempered panel, it will shatter.
Cordless drill with adjustable clutch. We recommend the use of a cordless drill to avoid electrocution, as water needs to be applied over the hole saw during drilling. The clutch will limit torque transfer to the glass, reducing the chances of cracking the glass. Always set your torque (clutch) to the lowest level on the drill and adjust accordingly, patience is a virtue when drilling glass. Drilling template (included with the Synergy Reef Overflow Kit and you can download it here https://synergyreef.com/Manuals/Synergy_Reef_Drilling_Template_16_Shadow.pdf).
Tape measure, to determine mounting location.
Permanent Marker or wax pencil to mark mounting location.
Spring clamps and/or double sided tape to hold the template in place while you drill.
Water source. Spray bottle, garden hose, bucket, etc…
Correct Holesaw: We recommend a 63 mm Diamond Holesaw for best results. You can use a 65mm Diamond Holesaw or 2.5” can also be used for both our 16” Overflow and 20” Overflow. – For glass you will need to purchase a diamond coated holesaw bit – For acrylic you will need a standard holesaw bit with teeth sold at most home improvement stores.
Synergy Reef Shadow Overflow v1 Kit.
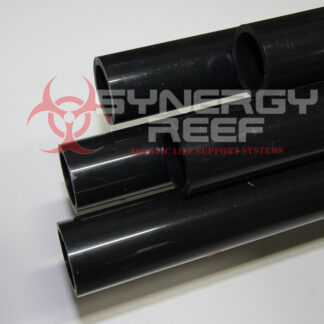
1.5” PVC for internal box. We have pre cut Internal pipe kits available here in many colors.
What Glue can I use to install the pipes on the rear box?
Use only these following solvents on the Rear Box fittings:
We recommend using Rectorseal® Mike 425L as the best solvent. If that cannot be found then Standard Clear Medium PVC Cement (Sold at local hardware stores) will also work, but may cause crazing on the rearbox fittings. This crazing could affect the fittings in some cases.
***DO NOT USE the any of the following as they can damage the Rear Box:
ABS TO PVC Transition cement (Teal Colored glue)
Purple PVC Primer. This can damage the plastics. Only use clear cleaner made for ABS plastics if needed.
Determine your desired water level. We find with typical applications within our recommended flow rates the water level in our boxes will rise ¼” to ½” (depending on your GPH of flow) from the bottom of the teeth slots. So mark the drilling template about 1” below the top and this is a rough guide as to where you water level will be. Use this measurement to determine where you would like to place your internal overflow box. Once you have your desired water level determined you can measure and mark how far down the holes will be from the top of the tank using our template. We recommend a minimum 1.5 to 2 inches from the water level to the top of the tank for rimless aquariums. Tanks with plastic bracing or euro bracing, the water level will be higher (depending on where the trim is located). Leave 1/8” to ¼” Clearance from trim to top of template so there is no interference with the trim and front box.
Now locate the drilling template where you have determined you need to drill the hole(s). Note that the template is the same outline as the actual Front Overflow Box. Make sure the template is in the CORRECT UP orientation. Manually align the template on the inside of the aquarium and MARK the holes with your marker.
After marking the holes locations, use the Rear Overflow Box and align it to the circles you just drew on the aquarium. If the rear box aligns with the holes and is not hitting the rear plastic trim on trimmed tanks (make sure to test with the lid on the rear box as well), then you are ready to mount the template and drill. Mount the drilling template on the outside of the aquarium. You can use duct tape to mount the template, although we do recommend using spring clamps to hold it in place. DO NOT use screw type clamps, these can cause too much localized stress and crack your glass!
Make sure to protect the opposite panel and position a bucket or reservoir to catch the plug when it drills through. Also if placing a bucket on the glass, protect the glass from the bucket by placing a piece of paper towel and/or clean cardboard so that the bucket doesn’t scratch the tank.
Ideally you will use a cordless drill with an adjustable clutch that can be set very light. This will prevent extra force on the glass should you bind the bit during drilling. It is now time to start drilling!! Pour some regular old water in the template hole to cool and lubricate the hole saw, you will want to keep the bit wet through the whole drilling process. The provided template will keep your hole saw in place. Water will channel thru the template. This is normal.
After drilling for a bit you should be able to remove the hole saw from the template and see a groove starting in the glass. Once you see this groove you may want to remove the drilling template; it has served its purpose. Be sure to start both holes before removing the template.
Remember to keep the hole-saw wet through the process for cooling and lubrication. As you get near to the end of drilling the hole you will see the water start to leak through, this is the sign that you are close. At this point you will want to use very light pressure and patience to minimize chip out on the opposite side. However, some chips is normal and likely so don’t worry about them as the gasket will cover and seal them.
Once you drill both holes, clean up the drilling mess and dry the aquarium and proceed to install the boxes.
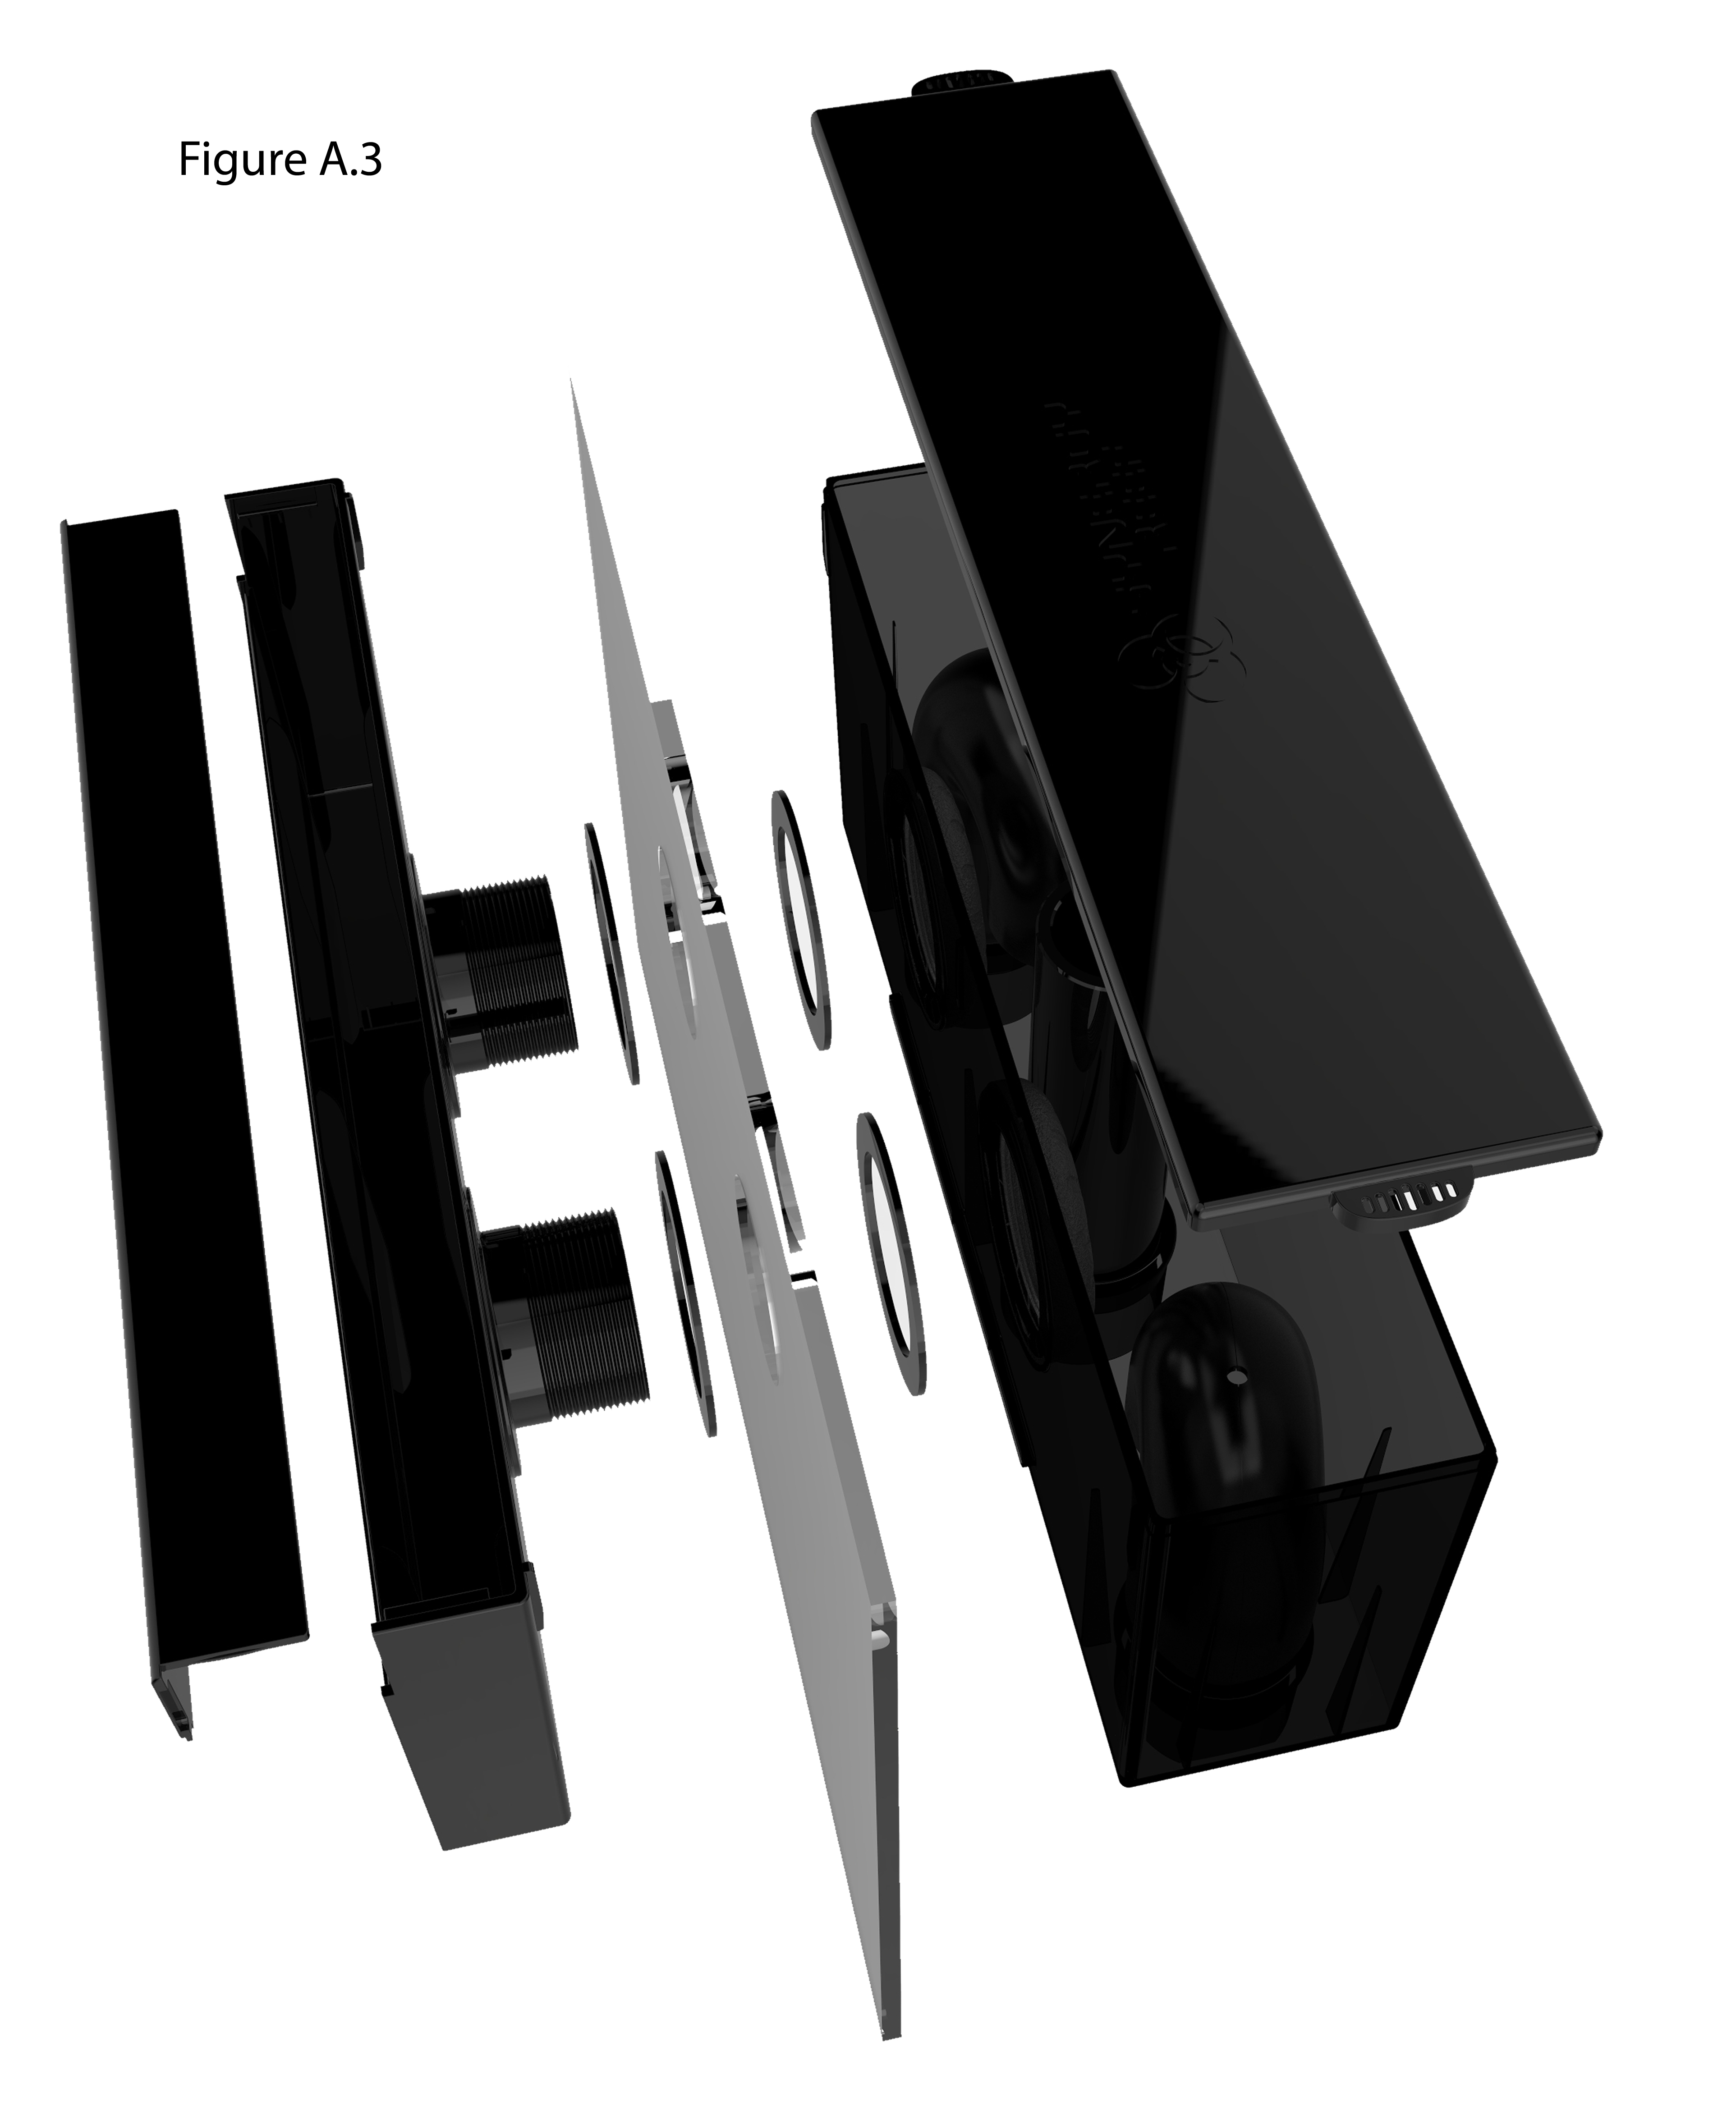
Remove the locking nuts from the front overflow box. Place 1 gasket on each of the bulkheads on the front overflow box and mount the Shadow Overflow by inserting the bulkheads through the holes you just drilled from the inside of the tank, this gasket will be between the front overflow box and the tank. Get another gasket and put it over each bulkhead on the outside of the tank. This gasket will be between the tank and the external box. Insert the external box through the bulkheads and secure it in place with the 2 locking nuts your removed earlier and hand tighten. Over tightening the bulkheads can cause the gaskets to leak. See figure A.3 on next page.
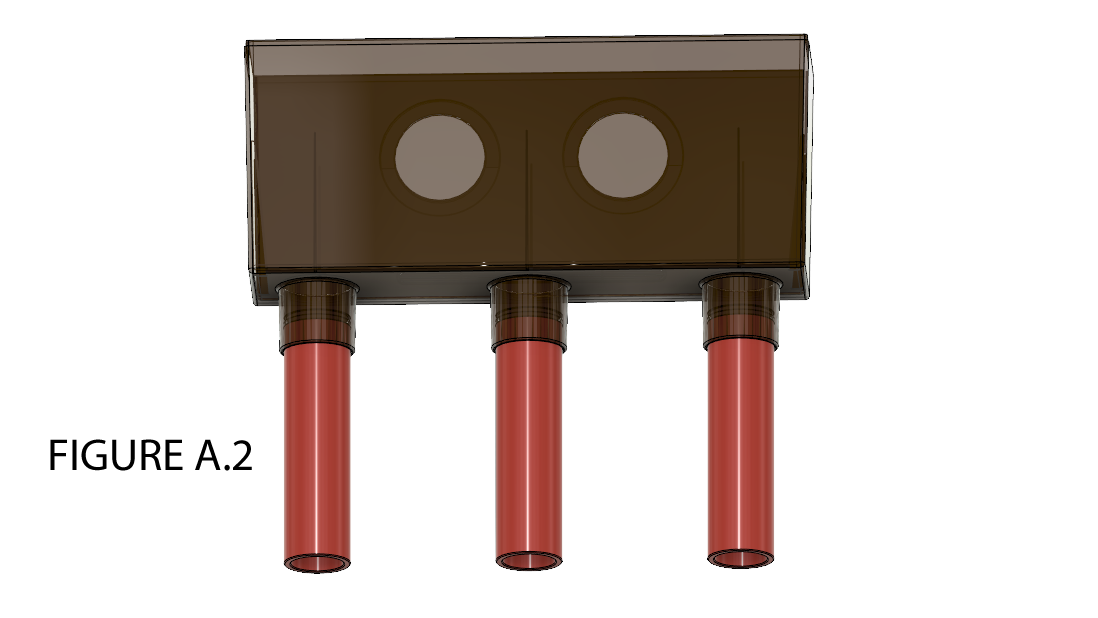
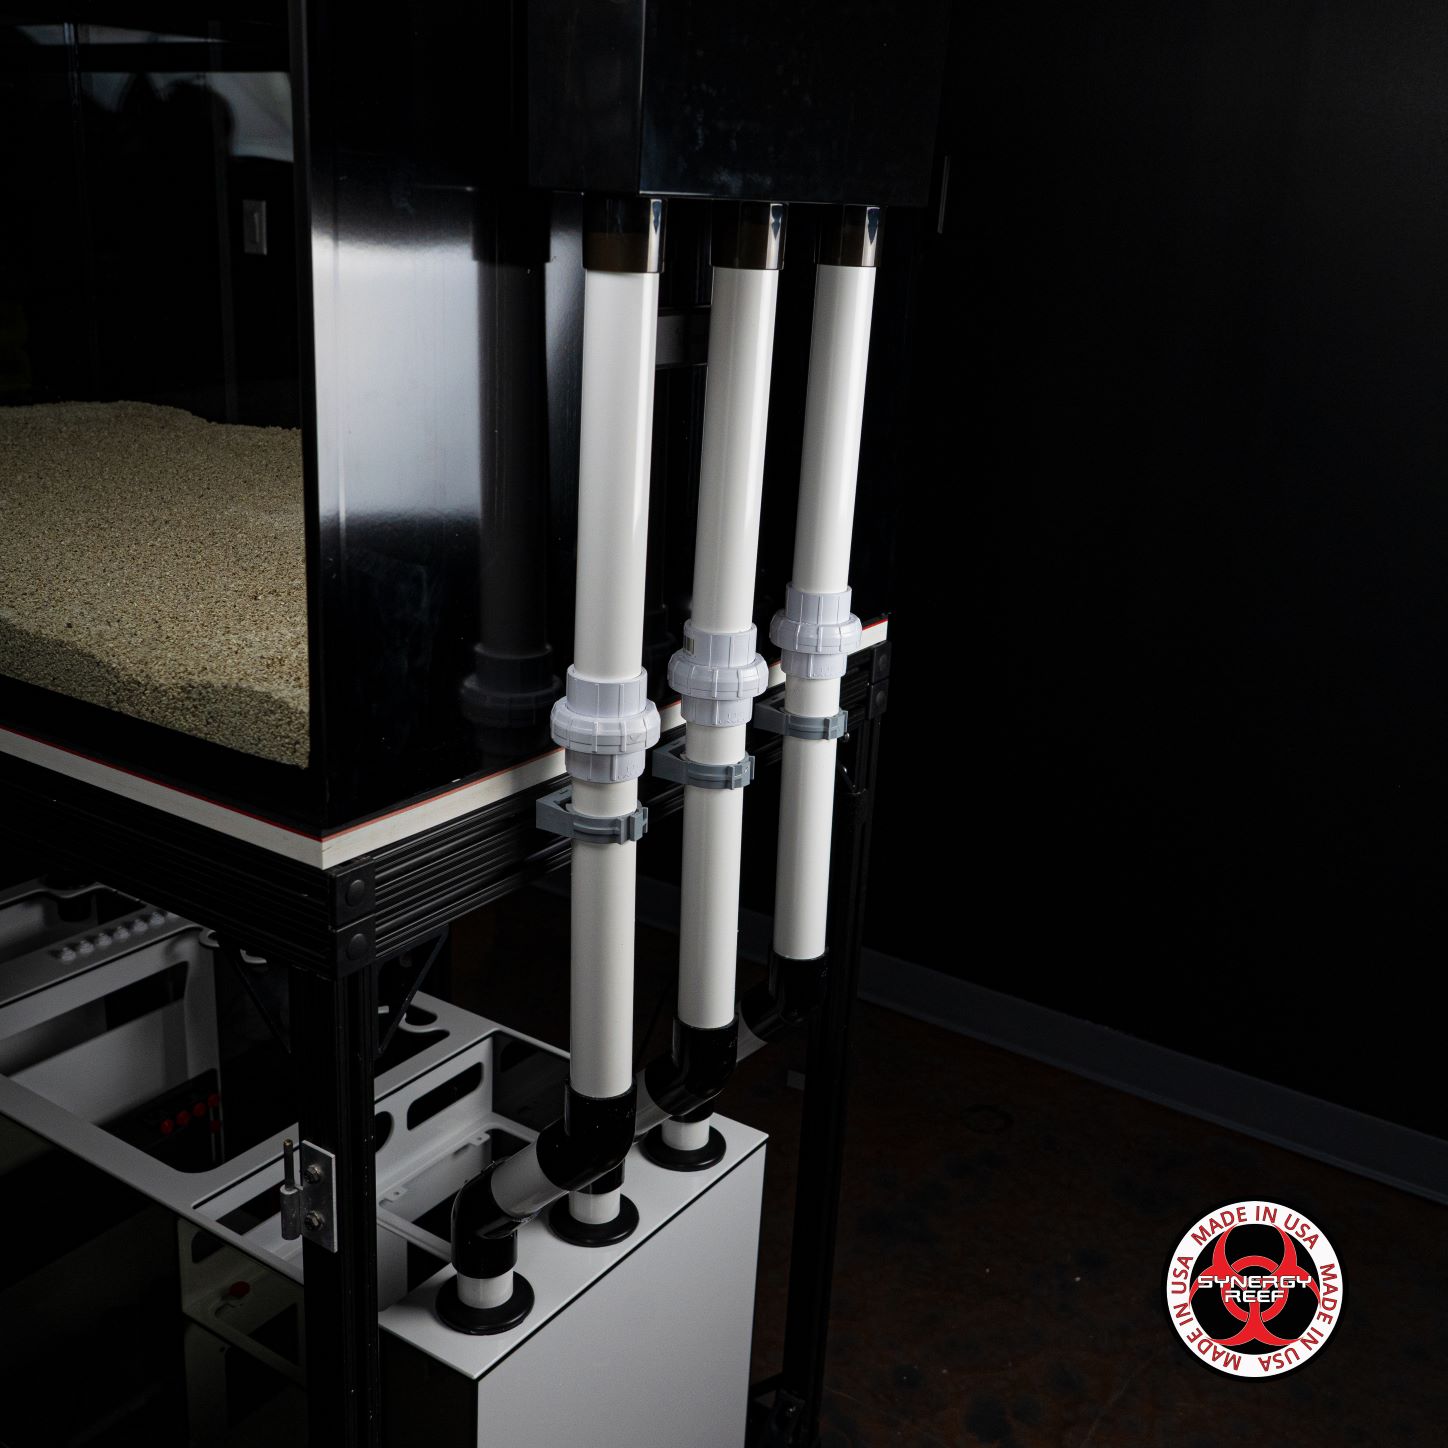
Remove the rear box from your tank and your overflow is now ready to plumb any way you choose. We recommend using 3 small pieces of 1.5” PVC (4” Pre Cut kits are available here) and connection these to the rear box and attaching unions to each. See figure A.2 for details. This makes it easier to remove or attach the pipes if needed for maintenance.
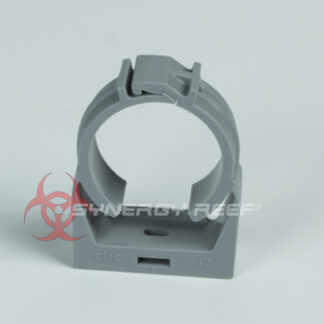
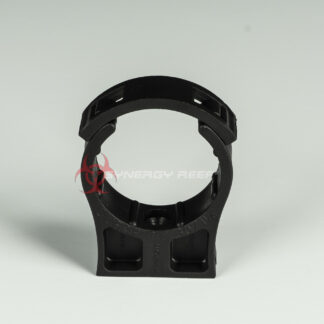
Make sure to support the external plumbing properly to avoid any weight pulling down on the overflow rear box. The overflow was NOT designed to have the plumbing hanging from it. We sell a few different pipe hanging clips here: 1.5″ Clic Clip or 1.5″ Cobra ClipPlumbing options for inside of the rear box: DO NOT GLUE any of the inside parts together.
OUTSIDE OF THE REAR BOX: **Remove from tank prior to gluing pipes to avoid damage. **DO NOT USE ABS TO PVC Transition Cement!** **DO NOT Force Dry fitted pieces into the bottom of the rear box. This could possibly damage the overflow. Only push PVC with a chamfered edge and with PVC Cement into the holes. ***
Attach 3 short pieces (approx. 4”) of 1.5” PVC to the bottom of the rear box with Medium Clear PVC Cement.
We recommend you using Medium Clear PVC Cement on outside of the rear box when gluing the PVC pipes to it. We have found that Standard PVC Cement will work the best, but extreme care needs to be used when gluing to make sure the pipes do not slip out or the ports get damaged from too much force. If the proper amount of glue is used it will not take any force to push the pipes into the ports. See figure A.2 Below:
We recommend that you attach 3 x 1.5” Unions to the 3 pieces you just glued into the bottom of the rear box. This will allow for easy removal of the overflow if needed in the future or for moving the overflow to another tank later.
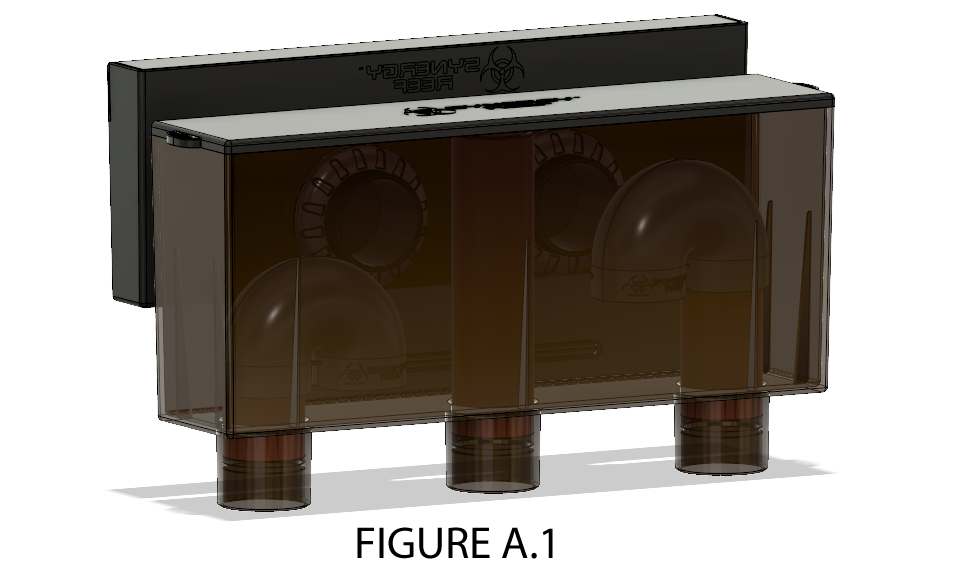
INSIDE OF THE REAR BOX Assembly: —-DO NOT GLUE THESE TOGETHER, Dry fitting it all that is needed.— 1. First Cut 1.5” PVC into 3 pieces. 1 x 6.25”, 1 x 2.75”, 1 x 3.5” These are just rough sizes and you may need to slightly modify the lenghts to your system’s flow. More information on Tuning the overflow can be found Here. 2. You will need to attach the following parts: a) 2.75” PVC Pipe to Synergy U-Pipe elbow (included in kit) b) 3.5” PVC Pipe to Synergy U-Pipe elbow (in some setups you may not need to use the U-pipe on the secondary drain) 3. Connect both of the U-Pipe assemblies you just made into any of the holes inside of the rear box assembly. 4. Connect the 6.25” PVC Pipe into the last open hole inside of the rear box assembly. This is your Emergency drain. 5. See FIGURE A.1 for finished assembly.
SYNERGY REEF SYSTEMS
IMPORTANT NOTICE: Read this entire Limited Warranty before purchasing, installing, or using this product. By purchasing, installing, or using this product, you are acknowledging that this Limited Warranty is part of the sale terms.
COVERED PRODUCTS. This Limited Warranty applies to all SYNERGY REEF OVERFLOWS (hereinafter referred to as the “Covered Products”). SYNERGY REEF makes the following express limited warranties for the Covered Products purchased and installed within the United States, subject to the conditions and limitations stated below.
These limited warranties are the exclusive warranties for the Covered Products. SYNERGY REEF disclaims all warranties, express or implied, for other products.
LIMITED WARRANTIES. SYNERGY REEF warrants to the Buyer that the Covered Products shall be free of manufacturing defects in material or workmanship that significantly impair their proper use or function of the Covered Products subject to the conditions of this Section. SYNERGY REEF disclaims all warranties, express or
implied, to subsequent purchasers or users. If the Buyer gives SYNERGY REEF notice as required below of a defect in materials or workmanship, SYNERGY REEF shall, at its sole option: (1) repair or replace the defective products; or (2) refund the original purchase price. SYNERGY REEF shall pay all associated labor costs for
repairs or replacements if Buyer gives proper notice as required below within 3 months from date of purchase. SYNERGY REEF may, in its sole discretion, pay some or all of the labor costs for repairs or replacement for claims made after 3 months from date of purchase. Replacement products may not exactly match replaced products.
Buyer is responsible for shipping of product back to SYNERGY REEF for warranty repairs. SYNERGY REEF will cover shipping costs of the repaired or replaced item(s) back to the buyer.
WHAT THIS LIMITED WARRANTY DOES NOT COVER. SYNERGY REEF is not responsible for and makes no warranties as to the following: 1) product failures or damages due to normal wear and tear, exposure to excessive heat or moisture, corrosive chemicals or substances, improper installation, defects or conditions of the existing
structure, misuse, abuse, modifications, and alterations; and 2) minor imperfections that do not affect the Covered Product’s structural integrity or use.
DISCLAIMER OF IMPLIED WARRANTIES. Neither SYNERGY REEF, nor its authorized dealers, make any other warranties, express or implied, including any implied warranties of merchantability or fitness for a particular purpose. In the event this disclaimer is deemed limited or ineffective, the terms and limitations of any
implied warranties shall be the same as the express limited warranties contained herein.
LIMITATION OF LIABILITY. This Limited Warranty sets forth SYNERGY REEF’s maximum liability for Covered Products. IN NO EVENT SHALL SYNERGY REEF OR ITS AUTHORIZED DEALERS BE LIABLE FOR ANY INCIDENTAL, CONSEQUENTIAL, OR SPECIAL DAMAGE RESULTING FROM THE SALE,
INSTALLATION, OR USE OF ANY COVERED PRODUCTS INCLUDING DAMAGE TO YOUR RESIDENCE, FURNITURE OR ANY AQUARIUM INHABITANTS. Some states do not allow the exclusion or limitation of incidental or consequential damages, so the above limitation may not apply to you. If SYNERGY REEF
provides any of the remedies identified above (i.e. repair, replace, or return of the original purchase price), then Buyer agrees that this limitation of remedy shall not have failed the essential purpose of the Limited Warranty. IN NO CASE SHALL SYNERGY REEF’S LIABILITY EXCEED THE AMOUNT YOU PAID FOR THE
COVERED PRODUCTS. IF YOU DISAGREE WITH THESE TERMS AND CONDITIONS DO NOT USE THE COVERED PRODUCT.
NOTICE OF CLAIM. Buyer shall promptly notify SYNERGY REEF of any claim under this Limited Warranty. SYNERGY REEF reserves the right to deny any claims made by the Buyer more than 6 months after any defect or other basis of a claim covered by this Limited Warranty is discovered by the Buyer or should have been discovered
by the Buyer.
CLAIM PROCEDURE. You should make claims under this Limited Warranty in writing to SYNERGY REEF via email to [email protected]. Claims to SYNERGY REEF should include the following information: (1) the claimant’s name, address, and telephone number; (2) the installation address; (3) the product description,
purchase price, and the date and location of purchase; (4) copy of the sales invoice or receipt; (5) a description of your product concerns (you may include photos); and (6) a brief summary of the attempts you made to address the concerns. SYNERGY REEF reserves the right to charge a fee for on-site product inspections.
ENTIRE AGREEMENT. This Limited Warranty, and all of the terms and limitations contained herein, constitutes the entire agreement between SYNERGY REEF and the Buyer. By purchasing, installing, or using the Covered Products, Buyer is not relying on any oral statements made by anyone, including its authorized dealers, which are in any way
different or contrary to the terms and limitations of this Limited Warranty. By purchasing, installing, or using any of the Covered Products, Buyer acknowledges that authorized dealerships are not agents of SYNERGY REEF and any statements or representations made by authorized dealerships and their employees are not attributable to SYNERGY REEF.
Some states do not allow the exclusion or limitation of incidental or consequential damages, so the above exclusions may not apply to you. SYNERGY REEF’S warranty is governed by the laws of the State of Tennessee, excluding its conflict of laws principles and excluding the provisions of the United Nations Convention on Contracts for the
International Sale of Goods. This warranty gives you specific legal rights, and you may also have other rights, which vary from state to state.
An overflow box serves the purpose of draining water from your display aquarium into your aquarium sump or filtration system. It typically comprises a weir and drainpipes designed to efficiently redirect water out of your tank and into the sump. The installation of overflow boxes can be undertaken either by the aquarium manufacturer or as an aftermarket addition by the end user.
Overflow boxes come in two main types: internal and external. An internal overflow box is situated inside the aquarium, often built by the tank manufacturer. However, these internal boxes can be large and bulky, occupying valuable space within the aquarium. In response to this, there has been a shift towards external overflow systems, which are located outside the aquarium. This design choice allows for more space within the aquarium, promoting a cleaner and less obstructed aesthetic.
An excellent example of an external, low-profile overflow system is our Shadow® Overflow, which not only effectively drains water but also minimizes the impact on the overall appearance of your aquarium and is virtually silent.
The Shadow® Overflow is a self install kit that allows anyone to add an overflow system to virtually any aquarium themselves. Whether you are having a custom aquarium built or want to buy one at a local pet store, you can use the Shadow® Overflow for your tank!
Why the Shadow® Overflow was developed?
More than 15 years ago, Synergy Reef embarked on a journey to revolutionize the aquarium industry by developing an overflow system that catered to the discerning needs of avid hobbyists. Our goal was to create a system that embodied the following key attributes:
Small Footprint in the Aquarium: We prioritized a design that minimizes space consumption within the aquarium, ensuring a sleek and unobtrusive presence while maximizing the aquatic display.
Low Noise Levels: Recognizing the importance of a tranquil aquatic environment, we focused on crafting an overflow system that operates with minimal noise, allowing enthusiasts to enjoy their aquariums without disruptive sound interference.
Ease of Installation: Streamlining the installation process was a core objective. Our aim was to provide hobbyists with a user-friendly system that facilitates straightforward setup, ensuring a hassle-free experience from the outset.
Ease of Maintenance: Acknowledging the significance of aquarium maintenance, we aimed to develop an overflow system that simplifies the upkeep process. Easy access and uncomplicated maintenance procedures were integral to our design philosophy.
Through years of dedication and passion, Synergy Reef has endeavored to meet and exceed these criteria, resulting in an overflow system that enhances the overall aquarium experience for hobbyists worldwide.
The History of the “Ghost” Overflow
Driven by a discerning need unmet by existing market offerings, Rick Lowe embarked on a rigorous journey to conceive and develop a proprietary overflow solution. Over an intensive period of 2-3 years dedicated to research and development, he successfully crafted a design that impeccably aligned with our specific requirements for an overflow system.
In 2013, we proudly introduced the inaugural version of our overflow, aptly named the “GHOST,” tailored for Reef Savvy. This momentous release marked a collaborative effort showcased at MACNA (Marine Aquarium Conference of America) 2013 in Miami, underscoring our commitment to innovation. The Ghost, originally a substantial 24″ wide overflow, demonstrated commendable performance for a BETA product, yet Rick Lowe identified areas for enhancement. Here is a article that was written about that first “”Ghost Overflow” that we designed and built https://aquanerd.com/2013/09/reef-savvy-ghost-overflow.html
Contrary to conventional wisdom favoring larger overflows, we recognized that they fell short of our paramount criterion: maintaining a “Small Footprint in the aquarium.” Simultaneously, our Synergy Reef 16″ overflow made its debut at MACNA 2013, with Rick proudly presenting the first prototype (See Photo below). In a strategic decision, we amicably parted ways with Reef Savvy, redirecting our focus towards refining our proprietary overflow design and engaging directly with our customers to provide the best experience.
Centered on perfecting the smaller 16″ version, we unveiled the “16” Synergy Reef Overflow” in 2014, embodying a culmination of our dedication to precision engineering. We no longer produced the 24″ Ghost, as we knew the overflow could be smaller with the same performance. Concurrently, we expanded our product line to include a 20″ Synergy Reef Overflow equipped with 1.5″ drains, catering to larger tanks and optimizing flow dynamics.
Rick holding the first production model of the 16″ Synergy Reef Overflow at MACNA 2013
The Shadow® Overflow was born!
Moving Forward to 2016: The Birth of the Shadow® Overflow
Now, let’s fast forward to 2016. After putting our 16″ Synergy Reef Overflow through over 5 years of rigorous testing and with over 2000 units in service, we decided it was time to up the ante. We teamed up with tool designers and fluid dynamic engineers to create something special – the Shadow® Overflow. Instead of the old-school method of handcrafting and gluing flat acrylic stock together, we switched to using injection molds. This process makes parts that fit together perfectly, bringing a whole new level of precision to our overflow systems. This also allowed us to design components that you cannot build with flat acrylic pieces.
Distinguishing the Superiority of the Synergy Reef Shadow® Aquarium Overflows
While it may seem that all aquarium overflows share the common function of draining water from the display into the aquarium, it is crucial to recognize the significant disparities among them. The success of our renowned Shadow Overflow has led to the emergence of numerous imitations in the market. Although these copycat products may bear a visual resemblance, it is imperative to emphasize the substantial differences in their design, build quality and performance.
We deliberately refrain from association with major online retailers, as our commitment extends beyond mere profit considerations. Our observation reveals that these platforms often prioritize financial gains over delivering the finest products to customers. Unfortunately, many “Copy Cat” products flood these online marketplaces, jeopardizing the authenticity and quality that discerning hobbyists deserve.
In our unwavering pursuit of excellence, we have chosen a distinct path. By selling directly to you and through a carefully selected group of resellers, we ensure that you receive the absolute best aquarium overflow at the most competitive price. This commitment is grounded in our dedication to providing aquarium enthusiasts with a superior and authentic product, transcending the compromises often associated with copycat alternatives.
Now, let’s talk about the Shadow® Overflow itself. While there are different types of overflow systems out there, like Durso, Herbie, and Bean Animal, we’ve taken a unique approach. We like to call it a “Modified Full Siphon,” borrowing bits from a few different methods, especially the Bean Animal. It’s similar but with our twist, optimizing how it works for your aquarium. And here’s the kicker – the Shadow Overflow is a universal overflow that can be configured in any of the above setups. It’s all about giving you the flexibility to make it work seamlessly with your aquarium.
The Shadow® Overflow has been through a few version changes since it’s introduction. We have made some major changes the the initial design and have made it even better. We are currently on V3 which can be found here Synergy Reef Shadow V3 Overflow
In the realm of aquarium enthusiasts, achieving the perfect balance of aesthetics and functionality is a constant pursuit. The choice of equipment plays a pivotal role in this endeavor, and when it comes to aquarium overflows, the Shadow® V3 Overflow stands out as a symbol of innovation and efficiency. This comprehensive guide aims to explore the features, benefits, and considerations associated with the Shadow® V3 Overflow, providing aquarists with valuable insights into seamlessly integrating this cutting-edge overflow system into their aquarium setups.
Understanding the Importance of Overflow Systems
Before delving into the specifics of the Shadow® V3 Overflow, it’s essential to grasp the significance of overflow systems in maintaining a healthy and balanced aquarium. Overflows serve as a crucial component in aquarium filtration, helping to remove debris, excess nutrients, and pollutants from the water. They also ensure a constant water level within the tank, preventing potential overflows and maintaining the stability of the aquatic environment.
Choosing the right overflow system is paramount, as it directly impacts water quality, clarity, and the overall health of marine life within the aquarium. The Shadow® V3 Overflow, with its advanced features, addresses these concerns while adding a the benefit of quiet operation to the aquarium setup.
One of the standout features of the Shadow® V3 Overflow is its innovative design and injection molded construction, crafted to minimize its impact on the visual appeal of the aquarium. Traditional overflow systems often draw attention away from the beauty of the aquatic environment and are very loud, but the Shadow® V3 takes a different approach. With its sleek and discreet profile, this overflow system seamlessly integrates into the background, allowing the focal point to remain on the vibrant marine life and captivating aquascape.
The Shadow® V3 Overflow achieves this minimalistic design through careful engineering, ensuring efficient water flow without compromising aesthetics. With up to 2500 Gallons Per Hour flow rates, aquarists can now enjoy the benefits of a high-performance overflow system without sacrificing the visual harmony of their aquarium setups.
Silent Operation for Tranquil Environments
Noise pollution is a common concern for aquarium enthusiasts, and the Shadow® V3 Overflow addresses this issue with its near silent operation. The advanced design of this overflow system incorporates features that reduce and minimize the sound associated with water flow. This silent efficiency creates a tranquil environment, enhancing the overall aquarium experience for both aquarists and their aquatic inhabitants.
Aquariums are meant to be serene and calming, and the Shadow® V3 Overflow contributes to this ambiance by ensuring that the filtration process remains unobtrusive. The quiet operation allows aquarists to appreciate the natural beauty of their underwater world without the distraction of disruptive noise.
Adjustable Flow Rate for Customized Filtration
One of the key advantages of the Shadow® V3 Overflow is its adjustable flow rate, providing aquarists with the flexibility to customize filtration according to the specific needs of their aquarium setups. Different marine environments require varying levels of water flow to maintain optimal conditions for the inhabitants. Whether it’s a high-flow reef tank or a low-flow planted aquarium, the Shadow® V3 accommodates these diverse needs.
The adjustable flow rate also caters to aquarists who may want to fine-tune their filtration system over time or in response to changes in the aquarium’s inhabitants. This adaptability ensures that the Shadow® V3 Overflow remains a versatile and reliable component in the long-term maintenance of the aquarium.
Considerations Before Integration
While the Shadow® V3 Overflow boasts an array of features that make it an appealing choice for aquarium enthusiasts, it’s essential to consider certain factors before integrating it into your setup.
Compatibility with Tank Size and Design
The Shadow® V3 Overflow is designed to cater to a variety of tank sizes and gallonage. Here are the 2 factors that you need to know prior to installing the Shadow® Overflow.
Your aquarium thickness must be from .25″ (1/4″) up to .75″ (3/4″)
Your flow rate must be below 2500 GPH for each overflow installed. Multiple overflow can be installed on larger aquariums.
Matching with Filtration Systems
Before incorporating the Shadow® V3 Overflow, evaluate its compatibility with your filtration system. All of our Synergy Reef Sumps are designed to be plug-n-play with the Shadow® Overflow. Different aquarium setups may feature various filtration components, such as sumps, protein skimmers, and media reactors. Ensuring that the overflow system aligns with these elements contributes to the overall efficiency of the filtration process, maintaining optimal water quality within the aquarium.
Ease of Installation and Maintenance
The ease of installation and maintenance is a critical factor in the decision-making process for aquarium equipment. The Shadow® V3 Overflow is designed with user-friendly installation in mind, but it’s advisable to review the installation instructions and requirements before making a purchase. Additionally, consider the accessibility for ease of maintenance to ensure a hassle-free experience in the long run.
Conclusion
In the pursuit of the perfect aquarium, where form meets function seamlessly, the choice of equipment plays a pivotal role. The Shadow® Overflow has been in service for over 10 years and has become a beacon of innovation, offering aquarists an overflow system that combines efficiency with a minimalistic design. Its silent operation, adjustable flow rate, and compatibility with various tank setups make it a versatile choice for aquarium enthusiasts striving to maintain the delicate balance of their aquatic ecosystems. This is the reason the Shadow® Overflow is the best overflow system in the World for aquariums.
Elevate Your Aquarium Control with Synergy Reef Sumps
Aquarium sumps play a pivotal role in providing enthusiasts with enhanced control over their tanks. These reservoirs contribute to water cleanliness by effectively filtering out accumulating organics, ensuring optimal filtration. Additionally, they serve as a secure space for the introduction of additives and essential elements, facilitating the success of your aquarium.
A key advantage of incorporating a sump into your system lies in the ability to conceal equipment such as heaters, protein skimmers, and monitoring probes away from the display tank. This not only enhances the aesthetic appeal of your aquarium but also promotes a clutter-free environment.
By opting for a sump, you introduce additional water volume to your system, fostering greater stability in key parameters compared to setups without a sump. This stability is crucial for creating an environment conducive to the well-being of your aquatic inhabitants.
At Synergy Reef, we understand the diverse needs of aquarium enthusiasts, offering a comprehensive range of sumps in various types and sizes. Our sumps are designed to cater to marine, reef, and freshwater aquariums, ensuring versatility and compatibility. Explore our selection of high-quality sumps to elevate your aquarium experience. Visit our website for more information on our sump options: Synergy Reef Sumps.
If you need assistance with finding the right sump for your next aquarium, don’t hesitate to contact us for more information or assistance!
Synergy Reef SK44 Sump and Shadow V3 Overflow
Navigating the Transition: From Freshwater to Saltwater Tanks
For those entering the realm of saltwater aquariums from the familiar terrain of freshwater tanks with their conventional setups, there’s a noteworthy shift in the dynamics. Setting up a saltwater tank involves nuances beyond the obvious distinctions, and one significant departure lies in the prevalent use of an overflow and sump system.
Unlike freshwater tanks where equipment is either contained within the tank or hangs on the back, saltwater tanks often employ an overflow and sump configuration. While this might seem like Captain Obvious pointing out the obvious, the differences extend beyond the surface.
In the context of saltwater setups, a sump is essentially an additional tank positioned under or away from the primary tank. It serves as a dedicated space for housing most of the equipment essential for the operation of the main display tank. Though smaller in size compared to the primary tank, the volume it contributes adds to the overall stability of the entire system.
The overflow, aptly named, is the mechanism through which water is drawn from the main display tank and directed into the sump. This is typically achieved by allowing water to overflow in a controlled manner, facilitating its transfer to the sump. Embracing this overflow and sump system in saltwater tanks brings about subtle yet impactful variations that contribute to the unique character of these aquatic environments. Our Shadow® Overflow is the industry standard in aquarium overflow systems. You can find more information about the Shadow® Overflow here.
The nitrogen cycle is a process that occurs in all aquariums, and it is essential for maintaining the health of the fish and other organisms living in the aquarium. This document will explain the “Cycle” and how it works.
Fig.A1 – Full Nitrogen Cycle
NH3 (ammonia) to N02 (Nitrite)
The nitrogen cycle begins when fish produce waste in the form of ammonia. Ammonia is toxic to fish and must be removed from the water. Bacteria called nitrosomonas (Fig.A2) convert the ammonia (Figure A.2 – Steps 1 to 2) into nitrite, which is also toxic to fish.
Nictrosomonas Fig .A2
The nitrogen cycle is important because it helps to break down the harmful waste produced by the fish and other organisms in the aquarium, making it safer for them to live in. It is essential to establish the nitrogen cycle in a new aquarium before adding fish to it, as the fish will produce waste from the moment they are introduced to the aquarium. This can be done through a process called “cycling” the aquarium, which involves adding a small amount of fish or using a product called a “cycle starter” to provide a source of ammonia. There are many different companies that make these cycle starter products. The bacteria that convert the ammonia and nitrite will then grow and establish a colony, allowing the nitrogen cycle to begin.
N02 (Nitrite) to N03 (Nitrate)
After nitrite is produced in an aquarium, it is then converted into nitrate by a type of bacteria called nitrobacter. (Fig.A3) Nitrite is toxic to fish and must be removed from the water to maintain the health of the fish and other aquatic life in the aquarium. Nitrobacter bacteria are found in most healthy aquariums and play an essential role in the nitrogen cycle by converting the toxic nitrite into the less toxic nitrate.
Once the nitrite is converted into nitrate (Fig.A1 – Steps 3 to 4), it can then be removed from the water through regular water changes. Nitrate levels that are too high can also be harmful to fish and other aquatic life, so it is important to monitor nitrate levels and perform regular water changes to keep them at a safe level. In a healthy aquarium, the nitrogen cycle will continue to process the fish waste, maintaining a balance between ammonia, nitrite, and nitrate and helping to keep the water clean and safe for the fish and other aquatic life.
Nitrobacter FigA.3 – Another type of bacteria called nitrobacter convert the nitrite into nitrate, which is less toxic to fish and can be removed through regular water changes.
How to remove Nitrate (N03) from your system.
There are a few different methods that can be used to remove nitrate from a marine aquarium, including:
Water changes: Regularly performing water changes can help to reduce the nitrate levels in your aquarium. By replacing some of the water in your tank with fresh, clean water, you can dilute the nitrate concentration.
Nitrate-removing media: There are several types of nitrate-removing media available for use in aquarium filtration systems, such as denitrifying filters or nitrate-removing resins. These can be effective at removing nitrate from the water.
Live rock and macroalgae: Live rock and macroalgae can be used to naturally remove nitrate from the water. These organisms are able to take up nitrate and use it as a source of food, reducing the nitrate levels in the water.
Nitrate-reducing bacteria: Certain types of bacteria can be used to convert nitrate into nitrogen gas, which can then be released into the air. This is known as denitrification and it can be done in a denitrification filter, also called a deep sandbed, can be added to the filter system.
Algae turf scrubbers : this device uses algae to absorb nitrate in the water and it is a natural, efficient and low maintenance way to remove nitrate.
Macro Algaes : using different macro algae in a refugium is also a very effective way to remove Nitrates. This does require removing or cultivating the algae as it grows, as to not allow the nitrates to be reintroduced into the aquarium.
It’s important to note that it’s not always necessary to completely eliminate nitrate from your marine aquarium, as some nitrate is required for the growth of beneficial microorganisms in the tank. Typically, a nitrate level of 20-40 ppm is considered acceptable in a marine aquarium.
It is also important to address the cause of high nitrate level, to prevent it from happening again, overfeeding, overstocking, lack of maintenance etc.
Water Changes – The most effective way to remove N03 (Nitrates) (Fig.A1 – Steps 5)
Water changes are a simple and effective way to remove nitrate from a marine aquarium. The basic idea is to replace some of the water in the tank with fresh, clean water. This dilutes the concentration of nitrate in the tank and can help to reduce nitrate levels over time.
To perform a water change, you will need to have a separate container of clean, pre-mixed saltwater that matches the temperature, salinity, and pH of your tank. It is recommended to use a good quality water conditioner to remove chlorine and chloramines from tap water, if you use tap water as a source.
Here are the general steps to perform a water change:
Turn off any equipment, such as pumps or filters, that may disturb the water or the inhabitants of the tank during the water change.
Use a clean and dedicated siphon or pump to remove some of the water from the tank, typically about 10-20% of the total volume depending on the nitrate level and the size of your tank, it could be more or less.
Add the pre-mixed clean water to the tank, to replace the water that you removed.
Keep an eye on temperature and salinity level, use a hydrometer or refractometer to make sure the new water matches the tank’s water.
Once the water change is complete, turn the equipment back on and observe the tank for a few minutes to make sure everything is running smoothly.
It’s important to do water change regularly and consistently. A good schedule can be once a week or every other week, depending on the size of the tank and the bioload it has. Keep in mind that more frequent water changes will be necessary in tanks with high nitrate levels, or if there are a lot of fish or other inhabitants in the tank.
Also it’s important to use a good water test kit, to keep an eye on the nitrate level before and after each water change, this will help you determine if the changes you are making are effective and if more is needed to be done.
Macro Algae – Refugium – Another effective way to remove N03
There are several types of macroalgae that can be used to remove nitrate from marine aquariums. Some of the most commonly used types include:
Caulerpa: This type of macroalgae is available in several different varieties and can grow quickly in a variety of lighting conditions. It is also able to take up nitrate and other nutrients from the water, making it an effective choice for removing nitrate from a marine aquarium.
Chaetomorpha: Also known as “spaghetti algae,” chaetomorpha is a type of green macroalgae that is known for its ability to remove nitrate, phosphates, and other nutrients from the water. This algae is a very good option if you are looking to address high levels of nitrate as well as other issues like phosphates.
Red Macroalgae: Such as Gracilaria and Hemprichii, These macroalgae species are also known for their ability to absorb nitrate from the water and are also a good alternative for those looking for a more decorative option for their aquarium.
Halimeda: This is a genus of calcareous green macroalgae, it is slow-growing but effective in removing nitrates from the water and can also help to maintain proper pH levels in the aquarium.
It’s important to note that some of these macroalgae can be invasive, and if they grow too much or get out of control, they can actually contribute to nitrate problem, but this can be controlled by pruning and keep a healthy balance between the algae and the other inhabitants of the tank.
It is also important to have a proper lighting and flow to support the growth of these macroalgae, and to make sure that you don’t have any herbivorous fish or invertebrates in the tank that will eat them.
Now you need to get the overflow plumbed into you sump. Here are some questions you first need to ask yourself to plumb it properly.
How many gallons per hour (GPH) will my tank be running?
– 2500 GPH is the Maximum flow rate for 1 Shadow Overflow. You can use 1 Shadow Overflow on any size aquarium that will be running anything up to 2500 GPH. If you have a larger aquarium and need more flow, just install more Shadow Overflows!
How many Shadow Overflows am I running?
– 1, 2, 3? This will indicate how many drain lines you will need. 1 Overflow will require 3 drain lines. 2 Overflows will need 6 drains. While some can be combined, it depends on each setup.
How many drain bulkheads does my current sump have?
– The Shadow Overflow requires a minimum of 3 drain lines up to 1.5″ each for the quietest operation. Some sumps only have 2 drain line ports. You will need to run the 3rd drain into your skimmer section.
What size are your sumps drain lines?
– We recommend 3 x 1.5″ drain lines on the sump for flow rates over 1500 GPH. If your sump only has 1″ drains installed on it, you can use it. You will need to reduce the drain lines down on the overflow to 1″, this does reduce your maximum flow rate to 1500 GPH.
How long will my drain lines be? Short runs under the stand or long runs to a basement or remote sump.
– The best way to plumb the Shadow drains is with short runs. While long runs will work, you will need to do your research and make sure the drains are all draining down, with no sections going up.
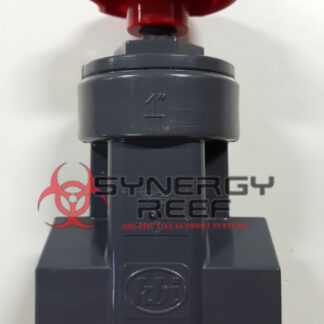
Where do I install the gate valve?
– The gate valve should be installed on the primary drain line. So what ever drain port you choose to use as the primary (any of the 3 will work perfectly fine) will have the gate valve installed on it. You need to install the gate valve where you can access it easily and still be able to see the rear box of the overflow. This way you can tune the rear box properly. We DO NOT recommend installing the gate valve in a remote location. This makes it very difficult to fine tune the overflow.
[vc_row][vc_column][vc_column_text]In this video we show you how to plumb the rear box of the Shadow Overflow. This is just how to hard plumb the fittings on the external side of the box. This is not a tuning video. We will be uploading that shortly.
Items needed to plumb the Shadow overflow Rear box:
PVC Cement, We prefer RectorSeal Mike 425L (Found on Amazon)
PVC Cutters or Saw
Measuring Tape
3 Pieces of 1.5″ PVC Pipe Min of 4″ in Length
3 1.5″ Unions
1 x 1.5″ Gate Valve
[/vc_column_text][/vc_column][vc_column width=”1/2″][vc_single_image image=”5980″ img_size=”full” add_caption=”yes” style=”vc_box_shadow_border”][/vc_column][/vc_row][vc_row][vc_column][vc_column_text]OUTSIDE OF THE REAR BOX:
What Glue can I use to install the pipes on the rear box of the Shadow V1?
Use only these following solvents on the Rear Box fittings:
We recommend using Rectorseal® Mike 425L as the best solvent. If that cannot be found then Standard Clear Medium PVC Cement (Sold at local hardware stores) will also work, but may cause crazing on the rear box fittings. This crazing will not affect the fittings.
DO NOT USE the any of the following as they can damage the Rear Box:
ABS TO PVC Transition cement (Teal Colored glue)
Purple PVC Primer. This can damage the plastics. Only use clear cleaner made for ABS plastics if needed.
**Remove from tank prior to gluing pipes to avoid damage. **DO NOT Force Dry fitted pieces into the bottom of the rear box. This could possibly damage the overflow. Only push PVC with a chamfered edge and with PVC Cement into the holes. ***
Attach 3 short pieces (approx. 4”) of 1.5” PVC to the bottom of the rear box with above mentioned solvents.
We recommend you using Rectorseal Mike 425L on outside of the rear box when gluing the PVC pipes to it. We have found that this Cement will work the best, but extreme care needs to be used when gluing to make sure the pipes do not slip out or the ports get damaged from too much force. If the proper amount of glue is used it will not take any force to push the pipes into the ports. See figure A.2 Below:
We recommend that you attach 3 x 1.5” Unions to the 3 pieces you just glued into the bottom of the rear box. This will allow for easy removal of the overflow if needed in the future or for moving the overflow to another tank later.