
[vc_row][vc_column][vc_column_text]This detailed video will show you how to properly drill your aquarium for the Shadow overflow system. Very simple and easy to do.
Installation Instructions:
Thank you for choosing the Synergy Reef Shadow® Overflow. Please note that this is a Do-It-Yourself project and can be installed in either glass or acrylic
aquariums. Always keep in mind that working with power tools, glass and acrylic have inherent dangers, including personal injury, electrocution, accidental death, or
cracked glass, so please be careful and wear gloves, shoes, pants, eye protection, etc… If you have any questions or concerns, please contact us.
Prior to installation, be sure that you have everything you will need to complete the installation. This includes, but is not limited to the following:
- Aquarium, either glass or acrylic, if it’s glass please make sure the panel you are going to drill is NOT TEMPERED! If you are uncertain about this
then STOP and please contact the tank manufacturer. If you attempt to drill a tempered panel, it will shatter. - Cordless drill with adjustable clutch. We recommend the use of a cordless drill to avoid electrocution, as water needs to be applied over the hole saw
during drilling. The clutch will limit torque transfer to the glass, reducing the chances of cracking the glass. Always set your torque (clutch) to the
lowest level on the drill and adjust accordingly, patience is a virtue when drilling glass.
Drilling template (included with the Synergy Reef Overflow Kit and you can download it here
https://synergyreef.com/Manuals/Synergy_Reef_Drilling_Template_16_Shadow.pdf). - Tape measure, to determine mounting location.
- Permanent Marker or wax pencil to mark mounting location.
- Spring clamps and/or double sided tape to hold the template in place while you drill.
- Water source. Spray bottle, garden hose, bucket, etc…
- Correct Holesaw:
We recommend a 63 mm Diamond Holesaw for best results A 65mm Diamond Holesaw or 2.5” can also be used for both our 16” Overflow and 20” Overflow.
– For glass you will need to purchase a diamond coated holesaw bit
– For acrylic you will need a standard holesaw bit with teeth sold at most home improvement stores. - Synergy Reef Shadow Overflow Kit.
- 1.5” PVC for internal box. We have pre cut Internal pipe kits available here in many colors.
Standard Clear Medium PVC Cement (Sold at local hardware stores) ***DO NOT USE ABS TO PVC Transition cement (Teal Colored glue)!!***
Drilling and Installing:
- Determine your desired water level. We find with typical applications within our recommended flow rates the water level in our boxes will rise ¼”
to ½” (depending on your GPH of flow) from the bottom of the teeth slots. So mark the drilling template about 1” below the top and this is a rough guide
as to where you water level will be. Use this measurement to determine where you would like to place your internal overflow box. Once you have
your desired water level determined you can measure and mark how far down the holes will be from the top of the tank using our template. We
recommend a minimum 1.5 to 2 inches from the water level to the top of the tank for rimless aquariums. Tanks with plastic bracing or euro bracing,
the water level will be higher (depending on where the trim is located). Leave 1/8” to ¼” Clearance from trim to top of template so there is no
interference with the trim and front box. - Now locate the drilling template where you have determined you need to drill the hole(s). Note that the template is the same outline as the actual
Front Overflow Box. Make sure the template is in the CORRECT UP orientation. Manually align the template on the inside of the aquarium and
MARK the holes with your marker. - After marking the holes locations, use the Rear Overflow Box and align it to the circles you just drew on the aquarium. If the rear box aligns with
the holes and is not hitting the rear plastic trim on trimmed tanks (make sure to test with the lid on the rear box as well), then you are ready to mount
the template and drill. Mount the drilling template on the outside of the aquarium. You can use duct tape to mount the template, although we do
recommend using spring clamps to hold it in place. DO NOT use screw type clamps, these can cause too much localized stress and crack your
glass! - Make sure to protect the opposite panel and position a bucket or reservoir to catch the plug when it drills through. Also if placing a bucket on the
glass, protect the glass from the bucket by placing a piece of paper towel and/or clean cardboard so that the bucket doesn’t scratch the tank. - Ideally you will use a cordless drill with an adjustable clutch that can be set very light. This will prevent extra force on the glass should you bind the
bit during drilling. It is now time to start drilling!! Pour some regular old water in the template hole to cool and lubricate the hole saw, you will want
to keep the bit wet through the whole drilling process. The provided template will keep your hole saw in place. Water will channel thru the template.
This is normal. - After drilling for a bit you should be able to remove the hole saw from the template and see a groove starting in the glass. Once you see this groove
you may want to remove the drilling template; it has served its purpose. Be sure to start both holes before removing the template. - Remember to keep the hole-saw wet through the process for cooling and lubrication. As you get near to the end of drilling the hole you will see the
water start to leak through, this is the sign that you are close. At this point you will want to use very light pressure and patience to minimize chip out
on the opposite side. However, some chips is normal and likely so don’t worry about them as the gasket will cover and seal them. - Once you drill both holes, clean up the drilling mess and dry the aquarium and proceed to install the boxes.
- Remove the locking nuts from the front overflow box. Place 1 gasket on each of the bulkheads on the front overflow box and mount the Shadow
Overflow by inserting the bulkheads through the holes you just drilled from the inside of the tank, this gasket will be between the front overflow box
and the tank. Get another gasket and put it over each bulkhead on the outside of the tank. This gasket will be between the tank and the external box.
Insert the external box through the bulkheads and secure it in place with the 2 locking nuts your removed earlier and hand tighten. Over tightening
the bulkheads can cause the gaskets to leak. See figure A.2 on next page. - Remove the rear box from your tank and your overflow is now ready to plumb any way you choose. We recommend using 3 small pieces of 1.5”
PVC (4” Pre Cut kits are available here) and connection these to the rear box and attaching unions to each. This makes it easier to remove or attach the pipes if needed for
maintenance. - Make sure to support the external plumbing properly to avoid any weight pulling down on the overflow rear box. The overflow was
NOT designed to have the plumbing hanging from it. We sell a few different pipe hanging clips here: 1.5″ Clic Clip or 1.5″ Cobra ClipPlumbing options for inside of the rear box: DO NOT GLUE any of the inside parts together.
INSIDE OF THE REAR BOX:
—-DO NOT GLUE THESE TOGETHER, Dry fitting it all that is needed.—
1. First Cut 1.5” PVC into 3 pieces. 1 x 6.25”, 1 x 2.75”, 1 x 3.5”
2. You will need to attach the following parts:
a) 2.75” PVC Pipe to Synergy U-Pipe elbow (included in kit)
b) 3.5” PVC Pipe to Synergy U-Pipe elbow
3. Connect both of the U-Pipe assemblies you just made into any of the holes inside of the rear box assembly.
4. Connect the 6.25” PVC Pipe into the last open hole inside of the rear box assembly. This is your Emergency drain.
5. See FIGURE A.1 for finished assembly.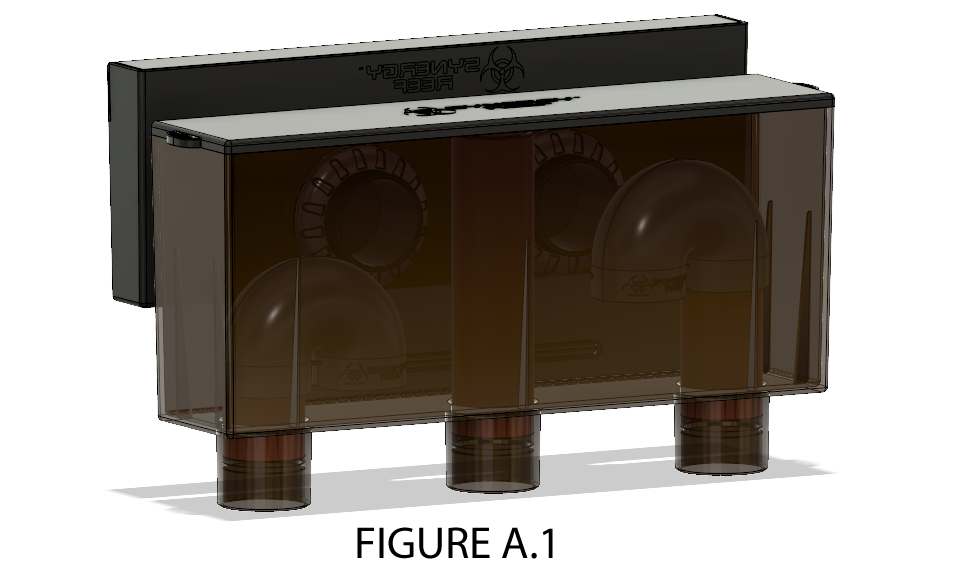
OUTSIDE OF THE REAR BOX: *****Remove from tank prior to gluing pipes to avoid damage.
**DO NOT USE ABS TO PVC Transition Cement!**
**DO NOT Force Dry fitted pieces into the bottom of the rear box. This could possibly damage the overflow. Only push PVC with a cleaned edge and with PVC
Cement into the holes. ***
1. Attach 3 short pieces (approx. 4”) of 1.5” PVC to the bottom of the rear box with Medium Clear PVC Cement.
2. We recommend you using Medium Clear PVC Cement on outside of the rear box when gluing the PVC pipes to it. We have found that Standard
PVC Cement will work the best, but extreme care needs to be used when gluing to make sure the pipes do not slip out or the ports get damaged from too much force. If the proper amount of glue is used it will not take any force to push the pipes into the ports.
3. Attach 1.5” Unions to the 3 pieces you just glued into the bottom of the rear box. This will allow for easy removal of the overflow if needed.FIGUREA.2
SYNERGY REEF SYSTEMS
IMPORTANT NOTICE: Read this entire Limited Warranty before purchasing, installing, or using this product. By purchasing, installing, or using this product, you are acknowledging that this Limited Warranty is part of the sale terms.
COVERED PRODUCTS. This Limited Warranty applies to all SYNERGY REEF OVERFLOWS (hereinafter referred to as the “Covered Products”). SYNERGY REEF makes the following express limited warranties for the Covered Products purchased and installed within the United States, subject to the conditions and limitations stated below.
These limited warranties are the exclusive warranties for the Covered Products. SYNERGY REEF disclaims all warranties, express or implied, for other products.
LIMITED WARRANTIES. SYNERGY REEF warrants to the Buyer that the Covered Products shall be free of manufacturing defects in material or workmanship that significantly impair their proper use or function of the Covered Products subject to the conditions of this Section. SYNERGY REEF disclaims all warranties, express or
implied, to subsequent purchasers or users. If the Buyer gives SYNERGY REEF notice as required below of a defect in materials or workmanship, SYNERGY REEF shall, at its sole option: (1) repair or replace the defective products; or (2) refund the original purchase price. SYNERGY REEF shall pay all associated labor costs for
repairs or replacements if Buyer gives proper notice as required below within 3 months from date of purchase. SYNERGY REEF may, in its sole discretion, pay some or all of the labor costs for repairs or replacement for claims made after 3 months from date of purchase. Replacement products may not exactly match replaced products.
Buyer is responsible for shipping of product back to SYNERGY REEF for warranty repairs. SYNERGY REEF will cover shipping costs of the repaired or replaced item(s) back to the buyer.
WHAT THIS LIMITED WARRANTY DOES NOT COVER. SYNERGY REEF is not responsible for and makes no warranties as to the following: 1) product failures or damages due to normal wear and tear, exposure to excessive heat or moisture, corrosive chemicals or substances, improper installation, defects or conditions of the existing
structure, misuse, abuse, modifications, and alterations; and 2) minor imperfections that do not affect the Covered Product’s structural integrity or use.
DISCLAIMER OF IMPLIED WARRANTIES. Neither SYNERGY REEF, nor its authorized dealers, make any other warranties, express or implied, including any implied warranties of merchantability or fitness for a particular purpose. In the event this disclaimer is deemed limited or ineffective, the terms and limitations of any
implied warranties shall be the same as the express limited warranties contained herein.
LIMITATION OF LIABILITY. This Limited Warranty sets forth SYNERGY REEF’s maximum liability for Covered Products. IN NO EVENT SHALL SYNERGY REEF OR ITS AUTHORIZED DEALERS BE LIABLE FOR ANY INCIDENTAL, CONSEQUENTIAL, OR SPECIAL DAMAGE RESULTING FROM THE SALE,
INSTALLATION, OR USE OF ANY COVERED PRODUCTS INCLUDING DAMAGE TO YOUR RESIDENCE, FURNITURE OR ANY AQUARIUM INHABITANTS. Some states do not allow the exclusion or limitation of incidental or consequential damages, so the above limitation may not apply to you. If SYNERGY REEF
provides any of the remedies identified above (i.e. repair, replace, or return of the original purchase price), then Buyer agrees that this limitation of remedy shall not have failed the essential purpose of the Limited Warranty. IN NO CASE SHALL SYNERGY REEF’S LIABILITY EXCEED THE AMOUNT YOU PAID FOR THE
COVERED PRODUCTS. IF YOU DISAGREE WITH THESE TERMS AND CONDITIONS DO NOT USE THE COVERED PRODUCT.
NOTICE OF CLAIM. Buyer shall promptly notify SYNERGY REEF of any claim under this Limited Warranty. SYNERGY REEF reserves the right to deny any claims made by the Buyer more than 6 months after any defect or other basis of a claim covered by this Limited Warranty is discovered by the Buyer or should have been discovered
by the Buyer.
CLAIM PROCEDURE. You should make claims under this Limited Warranty in writing to SYNERGY REEF via email to [email protected]. Claims to SYNERGY REEF should include the following information: (1) the claimant’s name, address, and telephone number; (2) the installation address; (3) the product description,
purchase price, and the date and location of purchase; (4) copy of the sales invoice or receipt; (5) a description of your product concerns (you may include photos); and (6) a brief summary of the attempts you made to address the concerns. SYNERGY REEF reserves the right to charge a fee for on-site product inspections.
ENTIRE AGREEMENT. This Limited Warranty, and all of the terms and limitations contained herein, constitutes the entire agreement between SYNERGY REEF and the Buyer. By purchasing, installing, or using the Covered Products, Buyer is not relying on any oral statements made by anyone, including its authorized dealers, which are in any way
different or contrary to the terms and limitations of this Limited Warranty. By purchasing, installing, or using any of the Covered Products, Buyer acknowledges that authorized dealerships are not agents of SYNERGY REEF and any statements or representations made by authorized dealerships and their employees are not attributable to SYNERGY REEF.
Some states do not allow the exclusion or limitation of incidental or consequential damages, so the above exclusions may not apply to you. SYNERGY REEF’S warranty is governed by the laws of the State of Tennessee, excluding its conflict of laws principles and excluding the provisions of the United Nations Convention on Contracts for the
International Sale of Goods. This warranty gives you specific legal rights, and you may also have other rights, which vary from state to state.
[/vc_column_text][/vc_column][/vc_row]